Today I wanted to share something that I did a couple of years ago, which was pretty easy and really popular. I had received a new sewing machine for my birthday, but had not really had many chances to set it up and try it. Then I read a magazine article about a woman who made stuffed toys out of worn out socks, and I decided to try making catnip toys for my cats and other cats in the family. I figured it would give me a chance to practice on my new sewing machine, and that the results didn't have to be perfect, since as long as catnip was involved, what the toy looked like would not matter that much!
As I worked on this project, I took pictures to document what I was doing. Then it occurred to me that maybe others would like to try something like this, so I put together a little tutorial. At some point (i.e., when I can figure out how to do it), I'll post it separately as a page or something, but in the meantime, I'm sharing it here for any interested parties. If you do decide to give it a try, please let me know if it worked out for you!
Materials
Worn out socks, washed and dry
Worn out pantyhose/knee highs/tights, also washed and dry
Scissors
Thread (doesn't have to match anything)
Straight pins
Ribbon trim (optional)
Catnip
Sewing machine
Part 1
Choose the socks you will use to make the pillows.

Cut them into smaller pieces.

Turn them inside out, and sew one of the open ends shut.

Then turn them right side out again; you should have a pocket.

The first part is complete.

Part 2
You will basically be repeating the above, using the tights/pantyhose. It's worth it to use this material inside, because the nylon keeps the catnip inside the pillow, meaning that the toy lasts longer.
Again, choose the materials you will use for the inside, and cut them into smaller pieces.

Turn them inside out, sew one end shut, and turn them back to the right side; you now have everything ready to start stuffing!

The second part is complete.
Finishing the pillows
Now, stuff each pocket with catnip, and pin shut for sewing.


(Yeah, I know what this looks like ...)

Sew the pinned part of the pocket shut; the inside of the pillows are ready!

Take a stuffed nylon pocket, and place inside one of the sock pockets. Pin the end for sewing, and then sew the pillows shut.**
**If you are using ribbon or any other kind of trim, you can add it at the same time you are sewing the outside pillow shut, or you can add it afterwards - personal preference. BE CERTAIN IT IS COMPLETELY SECURE, so that it can't be eaten/swallowed by a cat, which ruins the fun for everyone!
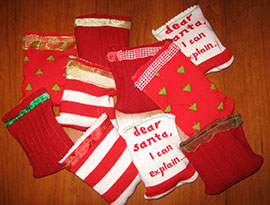
Give to the recipients for many hours of fun!

************
I made these a couple of years ago, and though they look pretty disgusting by now, they are still played with on a regular basis. Definitely some of the most successful gifts I've ever given ...
5 comments:
Awww. What a great gift and wonderful tutorial! Wish I had a cat on my list this year - and read that however you wish - LOL
Those are plumb cute. I may have to try making some for our cats.
I love this idea! I probably won't get around to it before Christmas, but it is definitely on my "must do" list!
If that's what it looks like, sewing it closed is silly. :)
Cute gift idea! I see many happy cats in my future.
Does that say "dear santa, I can explain..."?! That is hilarious!
Catnip is banned in this household. Gandalf tends to get a wee bit...frisky.
Post a Comment