Showing posts with label recipes. Show all posts

22 July 2026

Recipe Time: OK, I Actually *Liked* This Breakfast

Hi all! I hope you are doing well.  I've been MIA for longer than usual, I know. I've been sick - not in-the-hospital-sick, but pretty sick and only in the last few days have I felt well enough to power up the laptop and write. Being sick really sucks, but being sick in the summertime is the worst, especially since the a/c in our house is less than stellar. So during the truly hot miserable days, it's even a bigger challenge when you don't feel well. 

OK, obligatory whining and self-pity done. 😉

Moving on, I have a really wonderful recipe to share with you, for a breakfast dish. Breakfast, generally speaking, is probably my least favorite meal, unless we are going out to breakfast, or someone else is fixing it. Don't get me wrong, I eat breakfast every day, I know how important it is. During the week, it's usually cereal or yogurt and fruit (oatmeal in the winter), or sometimes I get crazy and have toast. My favorite "quick" breakfast is a pastry or doughnuts, but even I know those are best enjoyed few and far between.

The Tim, now - there's another story. Yes, sometimes he just has toast or something basic, but 4 out of 5 mornings during the week, he'll actually make himself a breakfast that involves cooking.

But here's one of the main differences between us - he loves eggs, in any form. Whereas, I like eggs well enough, but they are just not a fave of mine. And we have a longstanding agreement that on weekends, unless we are heading out for some running around, etc., or traveling, that I fix Saturday breakfast and he fixes Sunday breakfast. Which is fair, but a lot of times I struggle with what to fix. Since I'm not a huge fan of eggs, I'm not the best egg-cooker. I'm good at scrambled eggs, and I rock soft-boiled eggs, though I *really* don't like them. (Anytime it involves soft yolks, I'm out!)

As you can imagine, The Tim makes really wonderful weekend breakfasts, with a lot of variety. I have my moments, but ... meh. At least most of the time.

So a few weeks ago, I was really tired of my few tried-and-true breakfast dishes. I decided to poke around for a new idea, and I found this recipe. It had a lot of things going for it: relatively quick, easy to put together, and containing ingredients we generally have on hand. 

Et, voila!, as the French say:


Bonus: it smelled wonderful while it was baking!


I made our breakfast sausage (veggie, of course) separately, rather than put it in the casserole, but I can see how that would be yummy as an ingredient. Along with some fresh cherries, it was a breakfast success!

I highly recommend this recipe if you want to try something different - and if you are someone who likes breakfast for dinner, it would work for that as well!

I made enough for four servings, and we had the other two servings heated up later in the week, and that worked really well.

I didn't have enough tater tots to use them on the bottom and on the top of the casserole, so I only put them on the top. I used fresh herbs and onions, instead of dried ones, and threw in a red pepper that was close to its expiration date with us. I can see that you could have a lot of fun adding other things to this, depending on what is in your fridge or garden.

It was really delicious, and I had to laugh when I realized it was a Gordon Ramsay recipe, because he's not someone I go out of my way to follow or watch. But he gets a thumbs up for this recipe!

Let me know if you give it a try, and if you like it. It's a definite addition to  my (admittedly limited) breakfast repertoire. 

08 July 2025

Recipe: Cold Cucumber Soup

Hello all - while I'm at my volunteer gig, taking care of kitties, I thought some of you might enjoy a recipe that is perfect for summertime - provided that you like cucumbers!  This is something I've been making during the summer for years, and it's always good and especially welcome on a hot day. So for those of you who are cucumber-friendly, here you go!

Cold Cucumber Soup

2 medium cucumbers (or 5-6 of the small type)

2 cups buttermilk

3 green onions, sliced 

Pepper and dill to taste

--> Wash cucumbers, and cut them into 3/4 inch slices. Reserve six of the slices for garnish, by wrapping them up and refrigerating them.

Pour 1/4 cup buttermilk into a blender or food processor; add half of the cucumber slices and blend on high speed until smooth. Add remaining cucumber slices, pepper, and onion. Blend until smooth, about 1 minute. Stir in the remaining buttermilk, and refrigerate for at least 2 hours and no longer than 48 hours. At serving time, garnish each serving with reserved cucumber slices.

Needless to say, you can add any additional ingredients you may like, and you can use both fresh or dried dill and still get a yummy result.

I hope if you try this, you'll enjoy it. 😊

27 June 2022

... And Start All Over Again

Nothing's impossible, I have found
For when my chin is on the ground
I pick myself up, dust myself off
And start all over again.
-- Lyrics by Jerome Kern and Dorothy Fields

Well, the end of last week certainly took care of any good feeling happening after the beginning of the week. For me, personally, and for a lot of us in the States as well. I was still adjusting to one gut punch when another one showed up saying "Hold my beer."

And now it's Monday morning, which let's face it, few people anticipate with joy. But we're all still here, and we have a choice - give up and be miserable forever, or pick ourselves up, dust ourselves off, and start all over again.

Yet again. There have been so many agains, it's easy to take the giving up route. And if that is what you choose, that's up to you. It's hard to collect your heart and soul when it's been pulverized and put it all together well enough to keep going. I don't know about you, but I tend to go back and forth on it. But then I realize that in spite of what I might wish to do, if I wake up every day, maybe the universe is saying I should try my best.

Easier said than done.

Whenever I am in the depths, and have even one iota of physical and mental energy, I try to make myself do one thing that I hope will be successful. Not necessarily any specific thing, and nothing major. Maybe I'll decide to take a long, quiet walk. Or get rid of one corner of clutter. Anything that I can "accomplish."

On Friday, I took some of the scarves and mittens we wore during the winter and washed them so they could be put away until needed again. (Yes, I  know it's nearly the end of June and we haven't needed them for a while. So sue me.) While I was waiting for the washing machine to finish, so I could hang them up near a window upstairs to dry, I was reading a book, and the main character was making breakfast for some guests, and she made Rosemary-Orange Muffins. Hm, I thought, that sounds good, as I like every word of that phrase. So I headed to Google, and found a recipe that sounded a) good, b) simple, and c) had "normal" ingredients (i.e., not something like "1 milli-teaspoon of the rosemary oil of the plant only found in Bulgaria"). I decided to give the recipe a try for Saturday morning's breakfast. This gave me something to look forward to doing, and in the state of mind where I found myself, that was a definite bonus.

I decided that since I had never tried the recipe, which said that it made 20 muffins, I'd cut it in half, just in case it wasn't really that great. Because if you are not that fond of something, having 20 of them is a lot.

But I shouldn't have worried, because THEY. WERE. YUMMY! 

I would say that it took me maybe fifteen minutes to do the prep - mostly zesting the orange took the longest to do - and the ingredients were things at least in our house are generally around anyway. Especially in the summer when we always have at least one rosemary plant going.

Here are the muffins cooling out of the pan:


And here is my fancy-schmancy presentation, along with the pieces of the zested orange and some cottage cheese:


If, like us, you are a fan of three things - rosemary, oranges, and muffins - you need to make these. First of all, the house smelled amazing while they were baking. Second of all, they were so very very good. And third of all, they taste just as good, maybe even a bit better, the longer they sit. (I wrapped the extras and froze them. Took one out to thaw yesterday and have with a cup of tea, and it was perfect!)

Now the woman in the book I was reading referred to Sarah Chase's recipe, and I must admit I have no idea who Sarah Chase might be. I used this recipe, and can personally recommend it. You can bet that these will be added to our "keepers" and that the next time I'll likely make all 20 of them. 😊

In conclusion, what I can tell you is that yes, I am tired. Very, very tired. I am beyond mad, sad, and frustrated. And so much of the world is crap, we didn't need anymore, but we got it anyway. I hope you can find something small to call a win, because if you are reading this, you woke up today and you might as well try to make that worth something. Even if it's only trying a new recipe that makes you happy.

Time to start all over again. 
Again.

05 March 2021

Random Thoughts for a Friday

How has your week been?  Mine was fine - nice and uneventful at work (thank God!), pleasant enough weather, and some good reading and knitting.  It's really been a nice, ordinary, quiet, and unremarkable time, and that feels like something that is different than usual.  

Which means that I have been thinking my random thoughts.  Which means I'm going to share some of them.  Which means you have been warned, so if you get to the end and think "So?" - you have only yourself to blame!

  • You may have seen this image or versions of it over the last couple of days:


This is from Fibre Space, in Alexandria, Virginia, where Madame Vice President Kamala Harris stopped for a yarn purchase.  I knew that her stepdaughter was a prolific knitter, but apparently Kamala (which I like to call her, because I'm sure we'd be good friends) is a crocheter.  This pleases me in the most ridiculous way.
  • Last night for dinner, The Tim made the pasta dish that is all over TikTok apparently (I really don't pay that much attention to TikTok unless someone I know sends me a link, but apparently someone sent him this one).  Our verdict: It was yummy, but at least for us, a bit too salty.  We love feta cheese, and use it regularly, but for whatever reason, either the particular block of cheese we used, or the combination in the recipe of ingredients made the dish taste particularly salty.  We have gotten out of the habit of adding salt to our food (well, The Tim has - I never really was a salt person to start), and so when we come across something like this, it tastes like we have consumed a salt lick!  We might try it again, with the usual kind of feta we have to see if that changes the outcome.
  • I had requested this for Christmas, and ended up receiving it for Valentine's Day.  The Tim said he ordered it early in November, but with the mess that the mail service was at holiday time last year, it didn't arrive until the middle of January.  No matter, though.  I put it on the table next to my side of the bed.  And I have to say, it's cheaply made when you look closely, but when it is turned on, it is So.Very.Pretty!  It gives me such joy to see it, and even when lit in an otherwise completely dark room, has a pretty glow that is comforting light, but not too much light.  At the time, it was on sale for $19.99, and as much as I love mine, it's only barely worth that price as far as the quality of it.  But oh how it brings me joy!
  • I had a stunning realization the other day, and that was that I realized one of the things I missed the most during this pandemic was lipstick - ???  Now, I have to qualify that by saying it's not like I am a lipstick fiend - I have a few, and they are all colors that I like and think look good on me.  I would always put lipstick on in the morning before I left the house, and then it's not like I reapplied it all day.  But I always felt that it gave me an extra pop of color to get started.  I stopped putting it on when we all started to wear masks, because a) you can't see it, and b) it just smears off on the fabric of the mask anyway.  But the other evening we were getting ready to have a Zoom session with my niece and her husband, and I decided to put some on for that, and only then did I realize how much I missed wearing lipstick!  Odd but true.
  • We have recently been watching Lupin, and enjoying it so much!  Both of us enjoy thriller/mystery/crime stories, and this one is really appealing.  This one is not necessarily anything new or vastly different, but it's fun to see the sights of Paris, and the premise is a good one.  There's even part of an episode where the protagonist inadvertently reveals who he is, which does not generally happen.  We recommend it, if you have access to Netflix.
  • Today is apparently National Unplug Day, when we are all supposed to unplug from computers, phones, etc. and give ourselves a break.  I am clearly not doing that, but mostly because I don't overdo any of that, to be honest.  Particularly on weekends, I may only check online stuff once or twice a day.  But I know for people who a glued to their phones and other screens anyway, the pandemic has only increased that, so I hope for some it will be a beneficial thing to try.

And that's it for now.  I hope you have a good weekend.  I have no specific plans, just some ideas of things I'd like to try and get done.  But no specific deadlines or anything like that.  So I'm looking forward to just taking what comes and enjoying it.

I looked up a quote for the day, and this came up, so here you go:

"No one is perfect - that's why pencils have erasers."

Not a bad thing to keep in mind!  Take care, and I'll see you next week.

P.S. to friend and reader Alison - I hope you and yours are OK, I heard about the earthquake in New Zealand.  It sounded as if overall things were under control, but I hope that's really the case.  Take care!

09 June 2020

Recipe: Quick Vegetable Hash Skillet Dinner

Hello all - I've decided that today I will share one of my favorite recipes with you.  It's not difficult, but it does take a bit of planning ahead.  This falls into the category of comfort food in our house.  Granted, because our house does not get that cool and comfy in the summer, we tend to skip making this when the heat and humidity are in full swing, but if your house cools down better this could definitely be a year-round dish.

******

Quick Vegetable Hash Skillet Dinner

Ingredients:

2 potatoes, chopped and parboiled
2 carrots, chopped and parboiled
1 T. natural coarse salt
1 T. olive oil
2 cloves garlic, minced (more if you love garlic!)
1 onion, sliced
1 red or green bell pepper, chopped
1/2 tsp. turmeric
Pinch red chili powder (cayenne can be substituted)
1 can black beans, drained
4 cups chopped kale

Instructions:

Bring a pot of water to boil and add a teaspoon of natural coarse salt.  Add chopped potatoes and carrots and boil until just cooked ( 8-12 minutes).  Strain and set aside until needed. 

Heat olive oil in a large skillet on medium heat.  Add garlic and saute until starting to lightly brown.  Add onions, bell pepper, turmeric, chili powder, and a pinch of salt, and continue to saute until starting to soften (about 5 minutes)

Add parboiled potatoes and carrots, another pinch of salt, and a splash more of olive oil, if you like.  Spread the vegetables out evenly on the bottom of the skillet and cook until they start to brown, then toss.  Spread evenly again, and cook until they start to brown, and the potatoes are nicely carmelized.  (You can turn up the heat if the process seems to be taking too long, but watch everything so it doesn't burn.)

Add black beans, and washed and chopped greens, and stir well.  Add a pinch of salt and some black pepper and continue to cook until the greens are wilted and cooked.

Taste and adjust seasonings to your taste.  Add fresh tomato and a splash of fresh lime and give skillet a shake.

Serve while still hot.  (4 good-sized servings)

* This really doesn't take long - maybe half an hour all together. 
*  If kale isn't your favorite, you can substitute spinach, broccoli rabe, or just about any other green and leafy vegetable.
*  The recipe I adapted this from said that if you are trying to eat low-carb, you can substitute cauliflower for the potatoes.
*  That recipe also showed it served with a fried egg on top; I'm not a big egg person, so I left that out, but The Tim likes it that way.
*  You can really mix-and-match vegetables and spices according to the things you like.  I've done various substitutions based on what we had or did not have, and have never been disappointed.


Let me know if you give this a try, and how it turned out.  We think it's definitely a keeper!

25 November 2019

Recipe: Mainstay French Toast

Why not start the week by sharing a recipe?   Since this is the time of year that a lot of people have guests or extra family visiting, I though I'd share one of our favorites that is always a big hit.  It makes a nice amount and you organize it the night before you are going to serve it. 

The Mainstay Inn is a bed and breakfast in Cape May, New Jersey.  I've never stayed there, but years ago, the local newspaper had a feature on the best recipes from local B-and-Bs, and this was one of them.  I've made it several times and it has always turned out perfectly. 

Mainstay French Toast

Ingredients:

1 cup brown sugar
1/2 cup butter
2 Tablespoons corn syrup
2 tart apples, peeled and sliced
5 eggs
1 1/2 cups milk
1 teaspoon vanilla
1 loaf French bread

Cook sugar, butter, and syrup until well mixed and syrupy. 

Pour into a 9 x 13 baking dish, and spread apple slices over mixture.

Slice bread into 3/4 inch slices and place on top of apples.

Whisk together remaining ingredients and pour over bread.

Cover and refrigerate overnight.  When ready, heat oven to 350 degrees, and bake uncovered for 40 minutes.  Serve with spicy apple syrup if desired.

Spicy Apple Syrup

1 cup applesauce
1 (10-oz.) jar apple jelly
1/2 teaspoon cinnamon
1/8 teaspoon ground cloves
dash salt

Combine ingredients in a small saucepan.  Cook over medium heat, stirring constantly until jelly melts and syrup is hot.


NOTES:

*Even though I have made this numerous times, I have never made the apple syrup, so I can't say how good it is.  We just always serve it with maple syrup.

*I have also on occasion added raisins, dried cranberries, or dried sour cherries to this along with the apples. 

*This recipe as well as others I've shared here will always be available at the Recipes tab of the blog.

Let me know if you try this, and if so, what you think!

Bon appetit!

17 May 2019

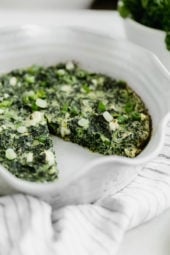
Recipe: Easy Spinach-Feta Pie

I haven't shared a recipe for a while, and early in March of this year, I mentioned trying a new recipe that was a big hit with us, and promised to let you in on it.  So though it took me a while, here you go.  Let me know if you try it, and what you think.

The original recipe can be found at Skinnytaste, and is for a crustless, lower fat pie.  When I tried it, I didn't have lowfat ingredients, and I also decided to put it into a pie crust we had in the freezer.  It's one of those recipes that is pretty easy to make your own, depending on ingredients that you have on hand or that you prefer.  And the resulting pie is kinda-but-not-a-quiche.  You really don't taste the eggs, as in a quiche - rather, they work as more of a binding agent.  This dish has quickly become a fave at our house.

Image from the Skinnytaste site, of their original version - but you get the idea, right?

Easy Spinach-Feta Pie

Ingredients:

  • 1 frozen pie crust (of course you can also make your own - I have no talent for that)
  • 10 oz. frozen spinach, thawed and with the liquid squeezed out
  • 1/2 cup chopped scallions
  • 2 T. chopped fresh dill 
  • 2 T. chopped fresh parsley
  • 1 T. chopped fresh oregano
  • 1/2 cup (2.5 oz.) crumbled feta cheese
  • 2 T. grated Romano cheese
  • 1/2 cup flour
  • 1 tsp. baking powder
  • 2/3 cup milk
  • 1 tsp. olive oil
  • 2 large eggs, beaten
  • 1/2 tsp. kosher salt
  • Pepper to taste

Directions:

1.  Take pie crust out of freezer and set aside while you prepare the filling.

2.  Preheat oven to 400 degrees Fahrenheit.

3.  Mix spinach, scallions, herbs, and feta cheese together and pour into the pie crust.

4.  Sift flour and baking powder together in a medium-sized bowl; add the remaining ingredients, mix well, and pour on top of other ingredients already in the pie crust.

5.  Bake 28-33 minutes, or until a knife inserted in the middle of the pie comes out clean.  Let it stand for 5 minutes before serving.

Of course, you can substitute dried herbs for the fresh ones, and I used Romano cheese, but I'm sure others would be just fine - use what *you* have and/or like!

Leftovers will keep for up to a week in the refrigerator if well wrapped or in a Tupperware container, and can be reheated in the microwave easily.

Bon appetit - and happy weekend!

03 June 2018

Recipe: Pasta with Uncooked Tomato Sauce

Hello there!  I had not really planned to be so incommunicado this past week, but work stuff and humidity left me with very little energy in the evenings.  It's weeks like that where you are extra happy to have a weekend to gather yourself back together.

Though it was still disgustingly humid yesterday, I did venture out so I could go to the Farmer's Market.  It was a pretty successful trip, and it allowed me to fix a dinner that required very little energy and more importantly, very little time cooking in the heat and humidity.  It's a recipe that I know has many variations, but this is the one I have always used, from Cuisine magazine (an oldie but goodie!), November 1983.  I thought I'd share it so you could give it a try this summer if it sounds good to you.  It helps when you can get fresh, yummy tomatoes, either home-grown or from the Farmer's Market.  Ours aren't ripe yet, but there were some *really* nice ones yesterday that made this possible.

*****

Pasta with Uncooked Tomato Sauce
(Makes 4 servings)

Ingredients:

6 fresh, ripe medium-to-large tomatoes
1 lemon (or 2 Tablespoons lemon juice)
2 cloves garlic, minced
Pepper
Fresh basil leaves
2 Tablespoons olive oil
1 pound pasta

To make the sauce:

Bring water to boil in a large pot.  Turn off heat, and drop tomatoes into the water for 2-3 minutes. Rinse under cold water, and peel.  Slice tomatoes in half, and scoop out seeds and juice; discard.  Break tomatoes halves into pieces into a bowl.  Slice lemon and squeeze juice into bowl with tomato pieces.  Add minced garlic and pepper.  Tear up as many basil leaves as desired and add.  Mix well, and allow to sit for at least 10 minutes.

**

Cook the pasta as directed and drain.  Place on a serving plate or into serving bowls, and drizzle 1/2 Tablespoon over each serving.  Pour sauce over each serving, and serve with additional pepper and some grating cheese.

Notes:  If you are making this near the time you are planning to eat, you can use the water and pan for the pasta to prep the tomatoes.  If you are making this ahead, cover and refrigerate, then take out of the refrigerator to get sauce to room temperature before serving. 

*****

I hope if you try this one, you'll find it as yummy as we do.  It's a perfect summer recipe for so many reasons!

15 April 2018

Recipe : Italian Coffee and Walnut Cake

I realized the other day that I had mentioned this recipe, and then forgot to share it with you - sorry about that!  I came across this years ago, in a magazine whose name is completely lost to the mists of time in my memory.  It's one of our favorites, because it's pretty straightforward, easy to put together, and the result is so good. 


Italian Coffee and Walnut Cake

7 Tablespoons softened butter
1 1/4 cup sugar
2 eggs, slightly beaten
1 3/4 flour, sifted with 1 Tablespoon baking powder
2/3 cup strong coffee**
7 ounces/~1 1/2 cup finely chopped walnuts or pecans (optional)

-- Preheat oven to 350 degrees Fahrenheit; grease and flour an 8-inch cake pan.

-- Cream the butter and sugar until fluffy, then beat in the eggs.

-- Add the flour alternately with the coffee until the mixture is smooth.  Fold in the nuts.

-- Pour the mixture into the cake pan, and bake for 1 hour, or until a tester inserted into the center comes out clean.

-- Cool on a wire rack before serving.

**We don't really drink coffee on a regular basis, so I have used instant coffee or espresso for this and it's been just fine; I've also sometimes gone to a local coffee shop and ordered a small black coffee and used that, so if you are not a coffee drinker, don't let that keep you from trying this recipe!

Also, the strength of the coffee changes the "color" of the cake - stronger coffee makes it darker (as in the photo above), whereas regular/not-as-strong coffee makes it lighter in appearance.  The taste is the same.

This cake freezes well, if you wait until it is completely cooled, then slice it and wrap each slice in plastic wrap, and place those in a ziploc bag in the freezer.  That way you can pull out a slice at a time to enjoy without it becoming stale.

*****

I hope if you try this, you enjoy it.  We really like it - not too sweet, not really coffee-tasting, and a nice dessert,or a snack with a cup of tea.  Let me know what you think!

25 November 2017

Recipe : Irish Brown Bread

Hello and happy Saturday!  Our Internet has been slow and/or non-existent for the past couple of days, so I am waayy behind on responding to any comments that have an e-mail address that I know.  So please don't think I'm blowing you off - things seem to have settled a bit, so you should be hearing from me all at once.  :-)

When the weather gets chilly, I enjoy baking even more than usual.  Of course, soon we'll be making cookies and other goodies as part of our Christmas celebration, but today I'm sharing my simple recipe for Irish Brown Bread.  This bread is so easy, and incredibly yummy - especially if you are lucky enough to have some Kerrygold butter to spread on it!  Even if you don't, it's good with just about anything on it, and is a perfect accompaniment to a cup of tea or a bowl of soup.

Irish Brown Bread

Preheat oven to 400 degrees F; grease bottom and sides of either a round cake pan, or two loaf pans and set aside.

You will need:

  • 2 cups whole wheat flour
  • 1 cup regular bread flour
  • 1/2 cup wheat germ
  • 1/2 cup oatmeal
  • 1 Tablespoon baking soda
  • 1 egg
  • 2 1/2 cups buttermilk

In a large bowl, combine whole wheat flour, regular bread flour, wheat germ, oatmeal, and baking soda.  Make sure they are all well mixed together, and then add the egg and buttermilk (these two ingredients make the dough soft and easy to handle).  Mix by hand until well blended.

Form into one large round loaf if you are using a round cake pan; or, put the batter into two loaf pans.  Cut a deep cross into the loaf.

Bake at 400 degrees for 20 minutes, then reduce heat to 200 degrees and bake another 30 minutes.  Let bread cool for 15 minutes, then remove from pan.

Wrapped loaves freeze well.

******

I hope if you give this a try, you'll like it!

04 November 2017

Recipe: Potato Mushroom Sausage Soup in the Crockpot

Happy Saturday!  I hope you are having a good one.  We are having a lovely, actual fall-like Saturday, which is fine with me.

About a month ago, I mentioned something I'd made in the crockpot from an idea in my head that turned out really well.  Some of you expressed an interest in the recipe, so I thought I would share it.

Potato Mushroom Sausage Soup in the Crockpot

Ingredients:

5 cups of water, or a combination of water and vegetable soup stock
3-4 garlic cloves, sliced
6 medium potatoes, scrubbed and chopped into chunks (I leave the skins on)
8-10 medium/large mushrooms, chopped
1/2 stick butter
3 onions, roughly chopped
'Slurp' of olive oil
Dash of hot sauce
1 Tablespoon dried dill, or a small handful of fresh dill, rinsed and chopped
2/3 cup milk
2 links veggie Italian sausage, cut into pieces
1 teaspoon olive oil

Place the first 9 ingredients (water/stock through the dill) into the crockpot.  Turn on the crockpot to the LOW settting and cook for 5 hours, checking occasionally to be sure the liquid does not cook away (when I made this it was not an issue, but I know different crockpots can vary).

After the initial mixture has cooked for the designated time, remove approximately 2 cups of the soup and using an immersion blender, mixer, or regular blender, create a smoother version of the soup; set aside briefly.

In a small pan, briefy saute the Italian sausage pieces, so they have some "brown" to them.

Add the blended mixture, browned sausage, and 2/3 cup of milk back to the crockpot, and stir to combine.  Cook on the HIGH setting for another hour, then serve.  Season with salt and pepper to taste.

Enjoy!

Notes:

This recipe is vegetarian, but obviously not vegan.

The resulting soup is thick, but not creamy.  If you want a thicker texture, you could add corn starch or flour mixed in cold water, or add some instant mashed potato flakes towards the end of the cooking -  however, keep an eye on it so you don't end up with a clump!

Other seasonings as well as/instead of dill can be added of course.  Fresh dill was on hand when I made this.

Other types of veggie sausage can be used, the but the veggie Italian sausage gives it a nice bit of spice (and is the reason I used only a dash of hot sauce).

Any leftovers keep well in the refrigerator or freezer.

**********

I hope if you try this, you like it.  We really enjoyed it, and I have every intention of making it again especially in cooler/cold weather when soup is one of the best things to eat!

09 October 2016

Sheila's Applescotch Crisp

Today in Philadelphia, it really, really feels like fall!  It rained most of yesterday and this morning, but around noon the rain stopped, and now it's sunny, breezy, and cool.  The perfect kind of day to share one of my favorite fall recipes with you.

This recipe was given to us by The Tim's late sister Sheila.  I have no idea where she got it, but when we lived in Indiana when The Tim was in graduate school, Sheila and her late husband Dave (who was also best man in our wedding) were both teaching at Purdue University, in West Lafayette.  We would visit them every once in a while, and always went to their house for Thanksgiving, since we would save the trip home for Christmas break.  Sheila loved to cook and bake, and this is one of her "go-to" desserts in the fall.

We used to also make this pretty regularly, but I thought I'd lost the recipe, so we haven't had it for years.  Then a couple of weeks ago, I found the card stuck to another recipe card.  Hooray!  So I made it again, and it was as yummy as we remembered.

If you are an apple fan, you'll want to give it a try.

*****

Sheila's Applescotch Crisp

Bottom layer:

4 cups, peeled, sliced apples
1/2 cup firmly packed brown sugar
1 tablespoon flour
1/4 cup milk
1/2 cup water

Combine all ingredients, making sure they are well mixed.  Pour into an ungreased 9-inch square pan.

Top layer:

2/3 cup flour
1/2 cup oatmeal (not instant)
1/2 cup chopped nuts (optional)
1/4 cup sugar
1/2 teaspoon salt
1 teaspoon cinnamon
1 package butterscotch OR vanilla pudding mix (not instant)
1/2 cup melted butter

Combine ingredients and mix until crumbly.  Sprinkle over apple mixture.  Bake at 350 degrees for 45 to 50 minutes, until the apples are tender and the topping is golden brown.  Serve warm or cool; keeps in the refrigerator nicely.

*I have only ever used butterscotch pudding mix for this, so I cannot vouch for how it tastes if you use vanilla pudding mix
*You can also add raisins, dried cranberries, or other ingredients - try what you like!
*It's yummy as it is, but a dollop of Greek yogurt on top works nicely

Let me know if you try this, and how/if you liked it.  It's really easy to put together and the house smells really wonderful while it's baking.  :-)

Have a good week!

31 July 2016

Veggie Packed Freezer Ready Breakfast Sandwiches

Well, here we are on the last day of July.  Personally, it was not a great month for me, though there were definitely high points (thank God!), as there are in even the worst times.  It was way too hot and humid for too many days (nearly all of them) during the month, so that didn't help.  But I made it, you made it, and that is always a good thing, right?

I decided to end the month by sharing another recipe.  I found this at Budget Bytes, and if you have some time to make it, you'll thank yourself on mornings when you are either rushed, or just uninspired.  I feel like it's an excellent template to use with whatever ingredients you might want to add, but it's also really really yummy if you just follow this recipe.  Even The Tim, who thinks making egg things ahead is silly, "because how long does it take to cook an egg?" finds these tasty, though I think he'll mainly leave them for me to eat since fixing something like this for myself on a weekday morning would be way more effort than I'm willing to make!

*****

Veggie Packed Freezer Ready Breakfast Sandwiches 
(recipe makes 6)

6 large eggs
1/2 cup milk
1/2 teaspoon salt
Freshly cracked pepper
1/2 lb. frozen chopped spinach
1/2 of a 12 oz. jar roasted red peppers*
6 English muffins
6 slices cheese**

Preheat oven to 350 degrees.  In a large bowl, whisk together the eggs, milk, salt, and pepper.

Thaw the spinach, then squeeze out as much excess moisture as possible.  Take the peppers out of the liquid in the jar, and slice into smaller pieces.  Stir the spinach and peppers into the egg mixture.

Coat an 8 x 9 or 8 x 12 inch casserole dish with nonstick spray.  Pour the egg and vegetable mixture into dish.  Bake for about 30 minutes, or until the center is set and the outer edges are slightly browned.

Allow the eggs to cool completely, then slice into six pieces.

Build the sandwiches by adding one piece of the baked eggs and one slice of cheese to each English muffin.  Wrap each sandwich in plastic wrap or a fold top sandwich bag, then place all sandwiches into a gallon sized freezer bag.  Freeze for up to 2 months.

To reheat, unwrap the sandwich, place on a microwave safe plate, and microwave on the defrost setting (or for 1 minute if you don't have that setting).  Then heat on high for 30 seconds at a time until heated through.*** Or, thaw in the refrigerator overnight and microwave on high until heated through.

Notes from me:

* I used the entire jar of roasted red peppers, because they are a fave of mine
** I didn't have pre-sliced cheese, so just sliced up as much cheese as I thought would work and added it to the sandwich
*** In our microwave, the sandwiches take ~ 1 1/2 minutes to heat through completely

ALSO:
> I used an 8 x 9 inch pan, and I think that the resulting pieces are the perfect size for the English muffins
> I really like honey mustard on my egg sandwiches. I added it when I was making them, which I think worked much better than having to add it when they are hot.  So I would suggest adding any condiments at the sandwich-building stage. :-)

*****

Let me know if you try this, and if you liked it.  Enjoy, and I'll see you in August!

08 July 2016

Creamy Avocado Alfredo Pasta

Hello there - am I the only one surprised that July 4th was just this past Monday?  I realized it earlier, and felt rather amazed to be honest.  Oh well.

Anyway, I thought I'd share another recipe today.  This one is nice because it is a) quick, b) filling, and c) doesn't make you want to pass out in the kitchen during hot weather when you are cooking.  It's based on a recipe I saw here, and really both are as much a template as anything.  Meaning that it's up to the cook to add different herbs or other seasonings, more/less garlic, whatever you want to try.  I've made this a few times this summer so far, and it's been yummy each time.  This makes enough for The Tim and I to have a very hearty meal on its own - you could probably add a salad or appetizer and stretch it for guests, or double the recipe for more people.

*****

Creamy Avocado Alfredo Pasta

1 cup milk*
2/3 cup fully mashed avocado (1 medium)
1-2 cloves garlic, minced
1/2 teaspoon salt
2 teaspoons vegetable or canola oil
Sprinkling of dill, basil, or other herbs
8 ounces uncooked pasta
Parmesan or other cheese for topping 
Pepper to taste

Prepare pasta according to package directions.  While it is cooking, make the sauce:

Whisk the first six ingredients in a small saucepan. (For a smoother and creamier sauce, mix in blender or use a hand blender to blend until smooth.)

Heat mixture in the saucepan until it begins to thicken, and starts to boil.

Drain pasta, and put it back into the pan.  Pour sauce over pasta, and mix thoroughly, coating the pasta.  Place in bowls and top with cheese and pepper.

Total time:  15 minutes

*edited - earlier "milk" was listed as "mild" - even though I proofread the post twice!  Thanks to those who asked about that.  

*****

Pretty straightforward, huh?  Let me know if you try it, and have a great weekend!

24 June 2016

Buttery Rhubarb Muffins

Hello and Happy Friday!  I'm having a bit of a rough day, as I fell yesterday on my way home from work, and have some killer bruises to show for it.  On my elbows and knees, so of course where I actually need to bend ... but compared to The Big Fall, it's nothing.  But add to it that I have a dentist appt for later this morning for a filling, and ... well, I needed a way to make it a better day. :-)

So I thought maybe I would share some recipes with all of you now and then.  This first one is a true yum-fest!  Of course, if you are not a rhubarb fan, you won't think so - in that case, you should head over to someone else's blog!

Anyway, I love rhubarb.  And it isn't around for very long, so I thought I'd share this today.  Usually when we get rhubarb, I make stewed rhubarb, which both of us like, but I wanted to look for something different.  I have tried a rhubarb cake (recipe next time!) which was a winner, but just this past Sunday, I made these muffins, and they are D-E-L-I-C-I-O-U-S.  Unfortunately, I failed to note the source of this recipe; it's from a magazine, but I don't remember which  one, and for that I apologize.

******

Buttery Rhubarb Muffins

1/2 cup butter
2 cups flour
1 cup sugar
2 1/2 teaspoons baking powder
1/2 teaspoon baking soda
1/2 teaspoon sea salt
1 cup sour cream (I used light sour cream (which is what we had), and it worked fine)
2 eggs
1 teaspoon cinnamon
1 teaspoon vanilla extract 
2 cups diced rhubarb

Set oven to 400 degrees F.

Cook butter over medium-low heat until browned (~ 4 minutes); cool.

In a large bowl, combine flour, sugar, baking powder, baking soda, and salt.

In a separate, smaller bowl or large measuring cup, mix sour cream, eggs, cinnamon, vanilla, and cooled butter.

Stir liquid ingredients into flour mixture, and fold in rhubarb.  Fill 12 lined muffin cups with mixture and bake for 18-22 minutes.  Cool in pan for 10 minutes, and then remove and allow to cool completely.

Makes 12 large muffins.


******

It's really pretty straightforward, and the results are worth it.  I can also tell you that 12 muffins for two people is a lot, so I froze some.  I had one yesterday, and it was just as yummy, so they freeze well.

Let me know if you try them, and what you think. And have a great weekend!

22 November 2015

How About Another Recipe?

I have to tell you, I'm very proud of myself - I got a lot accomplished today! Granted, I'm really pretty tired, but it was worth it.  Other than eating dinner and washing the dishes (The Tim is the cook tonight), I have no other plans or things I have to do this evening, so the couch and my pajamas will have all of my attention.  :-)

Before we get to the yummy part of this post, I wanted to thank those of you who responded to my post yesterday, with my idea for honoring/celebrating my dad's 100th birthday.  If you didn't see it, and are curious, it is here; please feel free to let me know your thoughts.

Now on to the recipe.

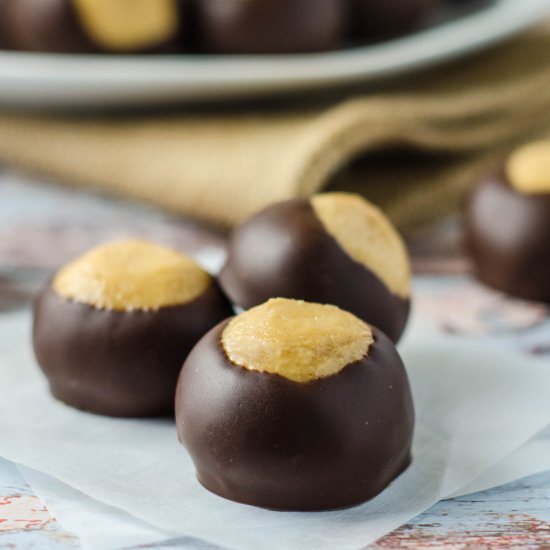
This is a recipe I have had for over 30 years.  At my very first "official" job out of college, I worked at the library at the University of Notre Dame, while The Tim was in grad school there.  At one of our departmental Christmas parties, one of co-workers brought a plate of homemade candies that I had never seen before or heard of, but boy were they yummy!

It turns out that she was from Ohio, which is the Buckeye State, and I guess these are more or less a candy that everyone who is from Ohio knows about.  Over the years, I've seen various versions of the recipe, and I've tried them at various places, but the recipe I was given is still my favorite, both for the taste and the simplicity.


Buckeyes

Ingredients:

1 lb. powdered sugar
1 stick butter or margarine
1 ½ c. peanut butter (smooth or crunchy, whatever you prefer)
6 oz. chocolate chips or chunks 
2 tsp. shortening 

Mix first three ingredients completely, and then form into whatever sized balls you like (if they are small, you can eat more of them!).  Place on waxed paper and chill for at least 1 hour.

Melt chocolate and shortening.  Take a toothpick and take peanut butter balls and dip into the melted chocolate.  Place on waxed paper to cool.

Enjoy!


Don't they look good?  I hope if you try the recipe, you'll let me know if you liked them.  I do have to warn you though - they are pretty addictive!  


NaBloPoMo Day #22

04 November 2015

How About a Recipe?

Here we are at NaBloPoMo Day #4, and so far I have to say I am enjoying both writing things and seeing what everyone else is writing.

However, today I am a little bit cramped for time, so I've decided to share a recipe with you, since for the most part I can just do a cut-and-paste to add it to this post.  :-)

In another lifetime and several jobs ago, I belonged to a book group at work.  We met once a month at lunchtime, and at the holidays we had a pot lunch.  One of the other people in the group brought this casserole, and I liked it so much I asked her for the recipe.  Since then I have made it pretty regularly, since it is both yummy and quite filling.

Recently I even made it successfully using the crock pot, and have added those notes at the end.

We have it as a main course, but I'm sure it would be a good side dish as well.  Let me know if you try it, and what you think.

Barley Feta Casserole
This is an excellent dish for a day when you would like a hearty meal, but also want to get the preparation out of the way so you can do other things.  It also has the advantage of being low-fat, if you are watching your fat intake and/or cholesterol.


Ingredients:

1 cup barley, rinsed in cold water
3 cups vegetable broth or water, heated (I usually use half broth/half water)
2 medium onions, chopped
1 green pepper, chopped
2 large tomatoes, cut into chunks
2-3 teaspoons of dried oregano (or even better, the equivalent in fresh if you have it)
1 clove garlic, minced
Freshly ground black pepper
2 cups feta cheese (or your cheese of choice, we like feta so we always use that)

Preheat oven to 350 degrees.

In a baking dish, combine everything EXCEPT the feta cheese. 

Cover the baking dish, and bake for 45 minutes.

Stir in the feta cheese, and bake uncovered for another 25 minutes, or until most of the liquid has been absorbed and the barley is tender.

Remove from the oven, and let it sit and “rest” for 5 minutes before serving.
  
Two additional things:

1.  This recipe makes quite a bit, and is good reheated.  I’ve never tried freezing the leftovers, so I can’t tell you how well that does or does not work.

2.  Another tomato sliced thinly on top looks nice, if you want to make it look prettier.

  
**This recipe is based on one from Low Cholesterol Cuisine, by Anne Lindsay.  (New York : Hearst Books, 1989)

NOTES FOR THE CROCKPOT:

When I made this in the crockpot, I added another cup of water/broth, and cooked it on High for 5-6 hours.  It worked just fine, so I hope if you try it you have good results.